Eventrac News
Adding Content and Pages to your Website
Adding Content and Pages to your Website

The web builder can be used to edit the look, feel, text and content of your event pages. Once your event is up and running, you will be able to access the ‘Web Builder’ from your eventrac dashboard and view the changes you want to make before they go live. Simply follow the steps below to make edits.
PART 1: Creating your content
Step 1: Click on the ‘Website Builder’
Navigate your dashboard to the top right to click on the drop-down button next to switch view. Here, select ‘website builder’. Then click 'Switch View'.

Step 2: Click 'Website Contents’
On the left-hand side click on the drop-down ‘Website Content’, and click ‘all contents’ below.

Step 3: Add Content
Click on add content to add text or information that you want your viewers to see on your site.

This will lead you to fill out the content you want visitors to see. Add text, images, and format it how you want it.

Step 4: Click submit once you are happy with it.
The button which says ‘Make this article the homepage’ should only be clicked if you want this newly created content to replace your homepage. This might only be necessary if you choose to cancel your event, for example. So make sure it stays unticked if this isn’t the case!

You can view the article by clicking the green ‘view’ button on the right-hand side of your item.

This will take you to the live version of your site for you to see as the example below:

PART 2: Adding your menu pages
To organise your content, you need to create menu headers for it to be categorised.
Step 1: Go to the ‘Menus’ Section
Once you can see that your page has been created and appears in ‘All Content’, navigate to the left-hand side of your dashboard and click on ‘Menus’

Step 2: Click ‘Add Menu’

Now, select what kind of menu you want to insert. One at the header, or the footer of the page. ‘footer_main-frontend’, is the main footer of your page, and ‘footer_baseline_frontend’ is the section underneath the main footer. Then click ‘Submit’.

Click submit to add it to your menu selection.
Step 3: Add content to your Menu
Click ‘Edit’ on the right of your menu.

Then click ‘add’ to the right of your chosen label

Step 4: Choose how you want your content to appear on your header tab
A pop up will appear which will allow you to choose if you want this to be an individual heading, or a sub-heading. If you want it to appear as an independent heading, click ‘No Parent’ in the parent drop-down box. If you want it to be a subheading of another page, click on the page you want it to be a subheading of.

You will then be able to see the new page come up on the menu bar of your event pages

PART 3: Adding a social platform to your website
Step 1: ‘Click on Social Platforms’
Click on ‘social platforms’ on the left-hand side of your dashboard. Here you can add a social page such as Facebook or Twitter to your platform. Enter the URL of the platform which you would like users to navigate to.

Click the green ‘submit’ button once you are done.
Step 2: Editing your logo and cover photo
Click on ‘Custom Styling’ on the left hand side of the dashboard. Here you will see your current logo, cover photo and favicon if you have one (this is the small shortcut icon which appears on your website search tab).

To add one of these, click on ‘Add more’

If you already have one of these, eg. a cover photo, you won’t be able to add a new one without deleting the previous one. To change one of these simply click on the red delete button next to the image you wish to change in the ‘All Uploaded’ section. Then upload another one which will replace it and click the green ‘submit’ button.
Recent News Posts
-
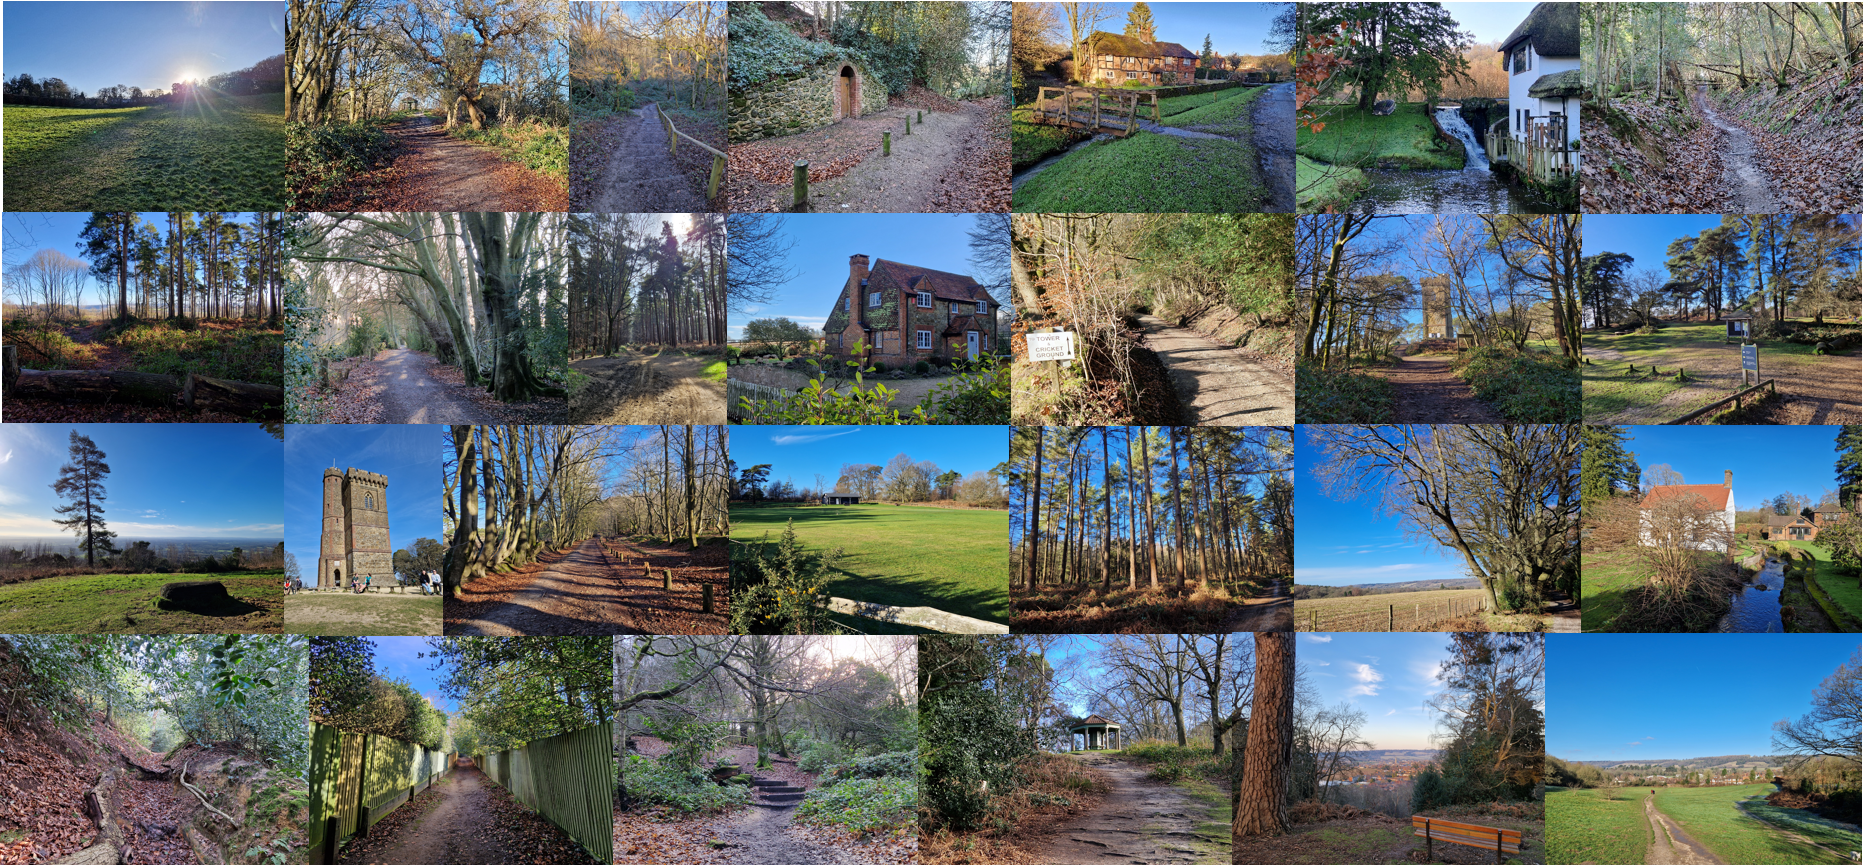
The Leith Hill Half Marathon Route In Photos
19/01/2026, 17:47
-
02/01/2026, 15:16
-

Finding a different path to the Kielder Marathon
01/12/2025, 22:09
-
The First-Ever New Forest Triple Series – What a Year!
28/10/2025, 13:06
-

Rugby: Where ellipsoid dreams came from
22/10/2025, 06:39
Tag
On Hand To Help
The team at Eventrac are on hand to assist with all components of your event. From advice on promoting your event through low cost channels such as social media, to a guided tutorial on a specific feature of Eventrac. We are here to help.